Routen-Planung
Contents
Android version

Standardmäßig ist die Moving Map in «Flight mode» (Flugmodus). Sie können ihr jederzeit zum «EDIT MODE» (Bearbeitungsmodus) beim Drücken auf dem «Edit» Button in der Symbolleiste umstellen.

Um eine Route zu erstellen:
- Wechseln Sie zum «Edit Mode», und eine gelb-schwarze gestreifte Leiste sollte im oberen Teil der Moving Map erscheinen. Ein Suchfeld wird ebenfalls im oberen Bereich des Route-Moduls auftauchen. (Siehe rechte Abbildung).
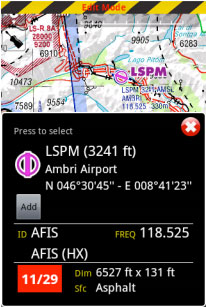
- Um Wegpunkte hinzuzufügen, klicken Sie auf einen Wegpunkt Ihrer Wahl auf der Moving Map. Im WegpunktPop-Up drücken Sie auf die Button Add. Ein gelber Stern sollte nun auf der Moving Map erscheinen und der Wegpunkt sollte in der Route-Liste sein.
- Als Alternative können Sie einen oder mehrere Wegpunkte-IDs in das Suchfeld bei dem Route-Modul eingeben und Search tippen. Mehrere IDs müssen durch einen Leerzeichen voneinander getrennt werden.


Im Bearbeitungsmodus ist es auch möglich Wegpunkte der Route-Modul-Liste wieder herzustellen oder zu entfernen. Als Alternative, können Sie einen Wegpunkt durch Anklicken auf der Karte und anschliessend durch den Auswählen der «Remove» Button löschen.
Es ist möglich einen Wegpunkt hinzuzufügen, indem Sie den Magenta Vektor antippen und halten und ihn zu einem
neuem Ort auf der

Karte ziehen. Daraufhin wird der Route ein neuer Wegpunkt hinzugefügt. Wenn die Position auf der karte nicht über einen existierenden Wegpunkt erfolgt, wird er nur als temporären Wegpunkt gestaltet und ist ein sogennanter “user waypoint”. Im Route-Modul können Sie den Routennamen, Windinformationen und Fluggeschwindigkeit eingeben, indem Sie auf «Summary» oben an der Liste klicken. Der

Routenname dient dazu um eine bestimmte gespeicherte Route in der «Routes list» (Routen-Liste) zu identifizieren. Wind- und Fluggeschwindigkeitsinformationen werden genutzt um die geschätzte Zeit (ETA) in dem oberen Bildschirmrand des Moduls anzuzeigen.


Wenn Sie mit der Route zufrieden sind, können Sie in den «Flight mode» (Flugmodus) zurückkehren. Die Route ist nun automatisch in der «Routes list» gespeichert (siehe rechte Abbildung).
Als Beispiel, beobachten Sie die drei gespeicherte Routen auf der Abbildung auf der linken Seite. Wenn Sie aus diesem Modul eine auswählen, wird Air Navigation sie als aktuelle Route für das Moving Map einstellen.

Der Button in der oberen rechten Ecke des Routen-Moduls, wie die Abbildung zeigt, dient dazu um Routen rückgängig zu machen, indem Sie die Button Reverse and save route drücken.
Sie können auch die Route per E-Mail senden, wenn Ihr E-Mail Konto auf dem Tablet / mobile Gerät eingerichtet ist. Sie können auch eine .gpx Datei als Route importieren.

Wenn Sie wieder den Flugmodus (Flight mode) einstellen, werden Sie auf dem nächsten Wegpunkt die Richtung (BRG) und den magnetischen Kurs (MC) zum Wegpunkt aus den aktuellen Position beobachten.
iOS version
By default, the moving map is in «flight mode». You can toggle the moving map from «flight mode» to «planning mode» at any time to create or amend a route by pressing the «EDIT» button in the Toolbar.
To start creating a route:

- Toggle to «Edit mode», a yellow and black striped bar should appear at the top of the moving map. A search field will also appear on top of the «Route» module.
- To add waypoints, press on waypoints of your choice on the moving map. In the waypoint popup, press the «add to route» option. A yellow star should now appear on the moving map and your waypoint should be in the «Route» list.
- Alternatively, you can input one or more waypoint identifiers in the search field on top of the «Route» module and press return.
Multiple identifiers must be separated by a space.
Note: to find a waypoint near an airfield, typically VFR report points, you can use the following syntax: W@LSZG (waypoint id@airfield id) then return. This will force Air Navigation to find the closest waypoint from LSZG with the identifier W.
In Edit mode it is also possible to reorder and remove waypoints from the list in the «Route module». Alternatively, you can remove a waypoint by pressing on the map and choose the «remove from route» option. It is possible to insert a waypoint by pressing on the magenta vector (leg) and moving to a new location on the map. As a result a new waypoint will be inserted in the «Route». If the location on the map is not over an existing waypoint, a «temporary» waypoint will be created. You can add this waypoint later to the database if you wish to do so.
 You can create a new waypoint by pressing 2 seconds at its location on the map. A popup will ask if you want to add this point to the database or simply use it as a “temporary” waypoint for the route or direct to.

In the «Route» module, you can press on the «Summary» line at the top of the list to set the route name and wind. The route name is used to identify a particular route in the «Route» list when they are saved. Wind and cruise speed information will be used to display estimated time and heading in «edit mode». In «flight mode» current speed as reported by the GPS will be used to compute estimated time. The button at the top right corner of the window can be used to reverse the route or duplicate it. When you are satisfied with your route, you can toggle back to «flight mode», the route is automatically stored in the «Routes list».
Back to index (Android)
Back to index (iOS)
